
Rahul
 LeetCode #155: Min Stack — Design a Stack with O(1) Minimum Retrieval
 LeetCode #20: Valid Parentheses — Master the Stack Pattern
 LeetCode #15: 3Sum — Master Sorting, Two Pointers and Duplicate Handling
 Instruction vs Context in AI Prompts: How to Tell AI What to Do and What Information to Use
 Rust Structs and Enums: Building Powerful Data Models
 Dissecting the High-Level System Architecture of Booking.com
 Kanban vs. Scrum: Which Agile Methodology to Choose?
 The Scaling Journey of LinkedIn: From Startup to Professional Powerhouse
 Mastering Code Review: A Guide for Reviewers and PR Creators
 ChatGPT: Unveiling the Power of AI in Conversational Experiences with Kairos Coders

Kairos Coders are here to help
So far in our Rust journey, we've learned how to:
But our programs have mostly executed from top to bottom.
Real applications need to make decisions and repeat operations.
For example:
If the user is logged in, show the dashboard.
If the payment succeeds, create the order.
Repeat this operation until the task is complete.
Loop through every product in the shopping cart.
That's what control flow allows us to do.
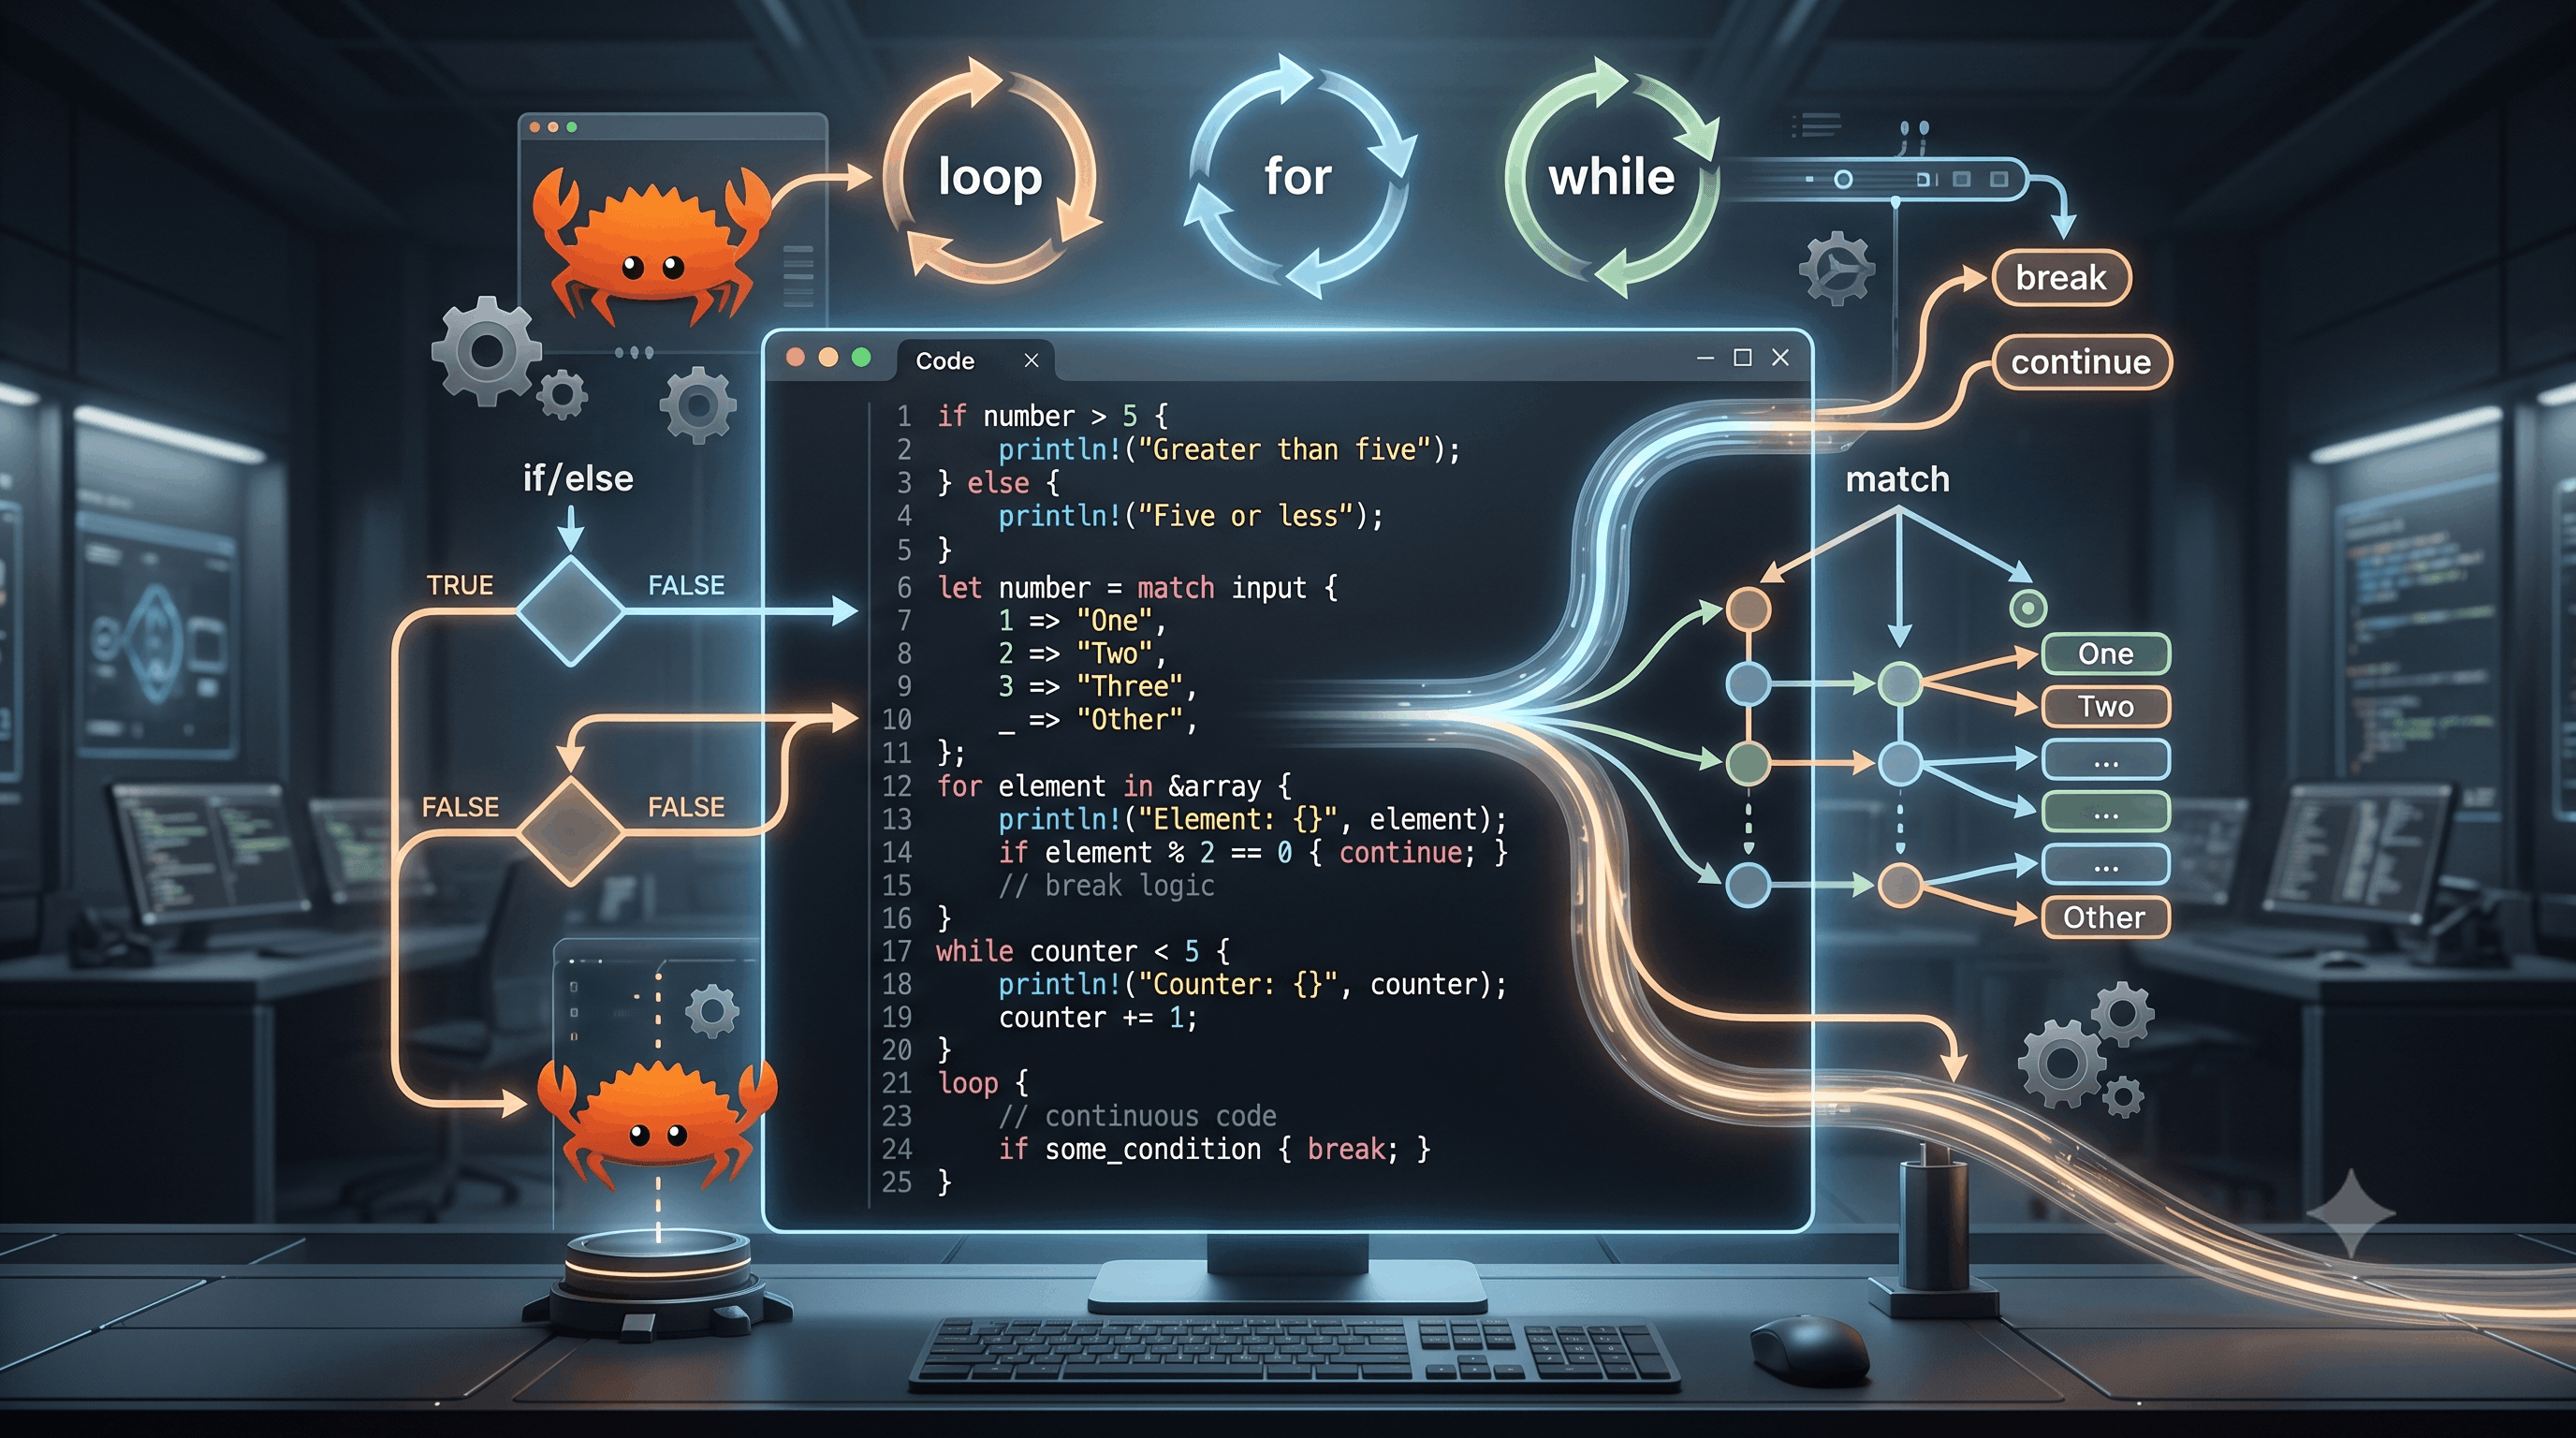
In this article, we'll learn:
ifelseelse ifloopwhileforbreakcontinueifloopmatchControl flow determines which code runs and when it runs.
Without control flow:
Statement 1
    ↓
Statement 2
    ↓
Statement 3
    ↓
Statement 4
With control flow:
             ┌── condition true ──→ Code A
Condition ───┤
             └── condition false ─→ Code B
Loops introduce repetition:
Start
  ↓
Run code
  ↓
Check condition
  ↓
Repeat
Rust provides several control-flow mechanisms.
if StatementThe simplest decision-making construct is if.
fn main() {
    let age = 20;

    if age >= 18 {
        println!("You are an adult.");
    }
}
If the condition is true, the code inside the block executes.
if WorksThe structure is:
if condition {
    // code
}
For example:
if temperature > 30 {
    println!("It's hot!");
}
The condition must evaluate to a Boolean:
true
or:
false
This is important if you're coming from JavaScript or similar languages.
You cannot write:
let number = 10;

if number {
    println!("Number exists");
}
Rust expects a Boolean condition.
Instead:
if number > 0 {
    println!("Number is positive");
}
This explicitness prevents many accidental bugs.
Conditions commonly use comparison operators.
| Operator | Meaning |
|---|---|
== | Equal |
!= | Not equal |
> | Greater than |
< | Less than |
>= | Greater than or equal |
<= | Less than or equal |
Example:
let age = 25;

if age >= 18 {
    println!("Allowed");
}
A common beginner mistake is confusing:
=
with:
==
= assigns a value:
let age = 25;
== compares values:
if age == 25 {
    println!("Age is 25");
}
Remember:
=   → assignment
==  → comparison
if With elseWhat if the condition is false?
Use else.
fn main() {
    let age = 16;

    if age >= 18 {
        println!("You can enter.");
    } else {
        println!("You cannot enter.");
    }
}
Output:
You cannot enter.
The structure is:
if condition {
    // true
} else {
    // false
}
else ifSometimes there are multiple possibilities.
fn main() {
    let marks = 75;

    if marks >= 90 {
        println!("Grade A+");
    } else if marks >= 80 {
        println!("Grade A");
    } else if marks >= 70 {
        println!("Grade B");
    } else {
        println!("Needs improvement");
    }
}
Rust evaluates the conditions from top to bottom.
The first matching condition executes.
You can combine conditions using logical operators.
The main operators are:
&&
||
!
&&&& means both conditions must be true.
let age = 25;
let has_ticket = true;

if age >= 18 && has_ticket {
    println!("You can enter.");
}
Both conditions must evaluate to true.
|||| means at least one condition must be true.
let is_admin = false;
let is_manager = true;

if is_admin || is_manager {
    println!("Access granted.");
}
Because is_manager is true, access is granted.
!! reverses a Boolean value.
let logged_in = false;

if !logged_in {
    println!("Please log in.");
}
Since:
logged_in = false
then:
!logged_in = true
ifYou can place one if inside another.
fn main() {
    let age = 25;
    let logged_in = true;

    if logged_in {
        if age >= 18 {
            println!("Access granted.");
        }
    }
}
However, deeply nested conditions can become difficult to read.
Often, you can simplify them:
if logged_in && age >= 18 {
    println!("Access granted.");
}
Prefer simple conditions when possible.
if Is an ExpressionHere's where Rust becomes particularly interesting.
An if can produce a value.
For example:
fn main() {
    let age = 20;

    let message = if age >= 18 {
        "Adult"
    } else {
        "Minor"
    };

    println!("{message}");
}
Output:
Adult
The if expression produces a value that is assigned to message.
Consider:
let result = if true {
    10
} else {
    "Rust"
};
This won't compile.
Why?
The if branch returns an integer:
10 → integer
while the else branch returns a string:
"Rust" → string
Rust requires the branches to produce compatible types.
if Without elseAn if can be used without else when you don't need a resulting value.
For example:
if age >= 18 {
    println!("Adult");
}
But if you're using if as an expression to produce a value, you'll generally need both branches:
let category = if age >= 18 {
    "Adult"
} else {
    "Minor"
};
loop KeywordRust provides an explicit infinite loop:
loop {
    println!("Running...");
}
This continues forever unless something stops it.
Usually, you'll use break to exit.
break
fn main() {
    let mut counter = 0;

    loop {
        counter += 1;

        println!("{counter}");

        if counter == 5 {
            break;
        }
    }
}
Output:
1
2
3
4
5
The break statement exits the loop.
The program works like this:
counter = 0
     ↓
loop starts
     ↓
counter += 1
     ↓
print
     ↓
counter == 5?
   ↙       ↘
 no         yes
 ↓           ↓
repeat      break
This is the basic structure of many loops.
continueSometimes you don't want to stop the entire loop.
You only want to skip the current iteration.
Use:
continue;
Example:
fn main() {
    let mut number = 0;

    loop {
        number += 1;

        if number == 3 {
            continue;
        }

        println!("{number}");

        if number == 5 {
            break;
        }
    }
}
Output:
1
2
4
5
The value 3 is skipped.
loopRust allows loop to return a value.
fn main() {
    let mut counter = 0;

    let result = loop {
        counter += 1;

        if counter == 5 {
            break counter * 10;
        }
    };

    println!("Result: {result}");
}
Output:
Result: 50
The expression:
break counter * 10;
returns a value from the loop.
This is a powerful feature of Rust's expression-oriented design.
while LoopA while loop runs while a condition remains true.
fn main() {
    let mut number = 1;

    while number <= 5 {
        println!("{number}");

        number += 1;
    }
}
Output:
1
2
3
4
5
The structure is:
while condition {
    // repeated code
}
while vs loopYou can often express the same logic using either.
Using while:
let mut number = 1;

while number <= 5 {
    println!("{number}");
    number += 1;
}
Using loop:
let mut number = 1;

loop {
    println!("{number}");
    number += 1;

    if number > 5 {
        break;
    }
}
while is generally clearer when the continuation condition is naturally expressed as a Boolean condition.
for LoopThe for loop is one of the most commonly used loops in Rust.
Example:
fn main() {
    let numbers = [10, 20, 30, 40, 50];

    for number in numbers {
        println!("{number}");
    }
}
Output:
10
20
30
40
50
This is particularly useful for iterating over collections.
Rust provides ranges.
For example:
for number in 1..6 {
    println!("{number}");
}
Output:
1
2
3
4
5
Notice:
1..6
includes 1 but excludes 6.
If you want to include the ending value, use:
1..=5
Example:
for number in 1..=5 {
    println!("{number}");
}
Output:
1
2
3
4
5
So:
1..5
means:
1, 2, 3, 4
while:
1..=5
means:
1, 2, 3, 4, 5
You can reverse an iterator:
for number in (1..=5).rev() {
    println!("{number}");
}
Output:
5
4
3
2
1
This becomes useful in many algorithms.
Consider:
let fruits = ["Apple", "Banana", "Mango"];
You can loop through it:
for fruit in fruits {
    println!("{fruit}");
}
Output:
Apple
Banana
Mango
This is much cleaner than manually accessing:
fruits[0]
fruits[1]
fruits[2]
for Is Built Around IteratorsAt a conceptual level:
Collection
    ↓
Iterator
    ↓
for loop
    ↓
Each item
Iterators are one of Rust's most powerful concepts.
We'll eventually dedicate several articles to:
mapfilterfoldcollectFor now, just understand that for works naturally with iterable values.
matchNow we reach one of Rust's most important control-flow features:
match
match allows you to compare a value against multiple patterns.
Example:
fn main() {
    let number = 2;

    match number {
        1 => println!("One"),
        2 => println!("Two"),
        3 => println!("Three"),
        _ => println!("Something else"),
    }
}
Output:
Two
_The underscore:
_
acts as a catch-all pattern.
In:
match number {
    1 => println!("One"),
    2 => println!("Two"),
    _ => println!("Something else"),
}
the _ handles every value that wasn't matched by 1 or 2.
match Powerful?Unlike a simple chain of if statements, match is designed around patterns.
It works especially well with:
These become extremely important in intermediate and advanced Rust.
match Must Be ExhaustiveRust requires a match expression to handle every possible case.
For example:
let number = 10;

match number {
    1 => println!("One"),
    2 => println!("Two"),
}
This is incomplete because what happens when number is 3?
Rust requires another pattern.
You can use:
_
to handle the remaining possibilities.
match number {
    1 => println!("One"),
    2 => println!("Two"),
    _ => println!("Other"),
}
This property helps prevent forgotten cases.
match as an ExpressionJust like if, match can return a value.
fn main() {
    let number = 2;

    let name = match number {
        1 => "One",
        2 => "Two",
        3 => "Three",
        _ => "Unknown",
    };

    println!("{name}");
}
Output:
Two
This is a very common Rust programming style.
You can match several values using |.
fn main() {
    let number = 2;

    match number {
        1 | 2 | 3 => println!("Small"),
        4 | 5 | 6 => println!("Medium"),
        _ => println!("Large"),
    }
}
This allows multiple patterns to share the same branch.
Patterns can also use ranges.
fn main() {
    let score = 85;

    match score {
        90..=100 => println!("Excellent"),
        75..=89 => println!("Good"),
        50..=74 => println!("Average"),
        _ => println!("Needs improvement"),
    }
}
This is a clean way to classify values.
match With Boolean ValuesYou can technically match a Boolean:
let logged_in = true;

match logged_in {
    true => println!("Logged in"),
    false => println!("Not logged in"),
}
However, for simple Boolean decisions, if is usually more readable:
if logged_in {
    println!("Logged in");
} else {
    println!("Not logged in");
}
Choose the control-flow construct that makes the intent clearest.
matchPatterns can become more sophisticated.
For example:
let number = Some(5);

match number {
    Some(value) => println!("Value: {value}"),
    None => println!("No value"),
}
Don't worry if Some and None are unfamiliar.
They belong to Rust's Option type.
We'll study Option in depth later.
Rust also allows loops to have labels.
This becomes useful with nested loops.
Example:
'outer: loop {
    loop {
        break 'outer;
    }
}
The label:
'outer
allows you to break out of the outer loop.
fn main() {
    'outer: for x in 1..=3 {
        for y in 1..=3 {
            println!("x={x}, y={y}");

            if x == 2 && y == 2 {
                break 'outer;
            }
        }
    }
}
The labeled break exits the outer loop rather than only the inner loop.
This is useful in certain algorithms, although it shouldn't be overused.
Let's combine conditions.
fn main() {
    let username = "admin";
    let password_correct = true;

    if username == "admin" && password_correct {
        println!("Login successful");
    } else {
        println!("Invalid credentials");
    }
}
Output:
Login successful
This demonstrates:
&&ifelse
fn main() {
    let marks = 82;

    let grade = if marks >= 90 {
        "A+"
    } else if marks >= 80 {
        "A"
    } else if marks >= 70 {
        "B"
    } else if marks >= 60 {
        "C"
    } else {
        "Fail"
    };

    println!("Grade: {grade}");
}
Output:
Grade: A
Notice that the entire if expression produces a value.
fn main() {
    let number = 5;

    for i in 1..=10 {
        println!("{number} × {i} = {}", number * i);
    }
}
Output:
5 × 1 = 5
5 × 2 = 10
5 × 3 = 15
...
5 × 10 = 50
This is a simple example of a for loop.
fn main() {
    let numbers = [10, 20, 30, 40, 50];
    let target = 30;

    for number in numbers {
        if number == target {
            println!("Found {target}");
            break;
        }
    }
}
The loop stops as soon as the target is found.
fn main() {
    let numbers = [10, 20, 30, 40, 50];

    let mut total = 0;

    for number in numbers {
        total += number;
    }

    println!("Total: {total}");
}
Output:
Total: 150
This introduces a very common pattern:
Initialize accumulator
        ↓
Loop
        ↓
Update accumulator
        ↓
Final result
You'll encounter this pattern frequently in algorithms.
fn main() {
    for number in (1..=5).rev() {
        println!("{number}");
    }

    println!("Launch!");
}
Output:
5
4
3
2
1
Launch!
A useful rule:
forWhen iterating over a collection or range.
for item in items {
}
whileWhen you have a condition controlling repetition.
while condition {
}
loopWhen you want an explicit loop that continues until break.
loop {
    if condition {
        break;
    }
}
break vs continueRemember:
break
↓
Stop the loop
while:
continue
↓
Skip current iteration
↓
Start next iteration
Example:
for number in 1..=10 {
    if number % 2 == 0 {
        continue;
    }

    println!("{number}");
}
Output:
1
3
5
7
9
The even numbers are skipped.
One of Rust's defining characteristics is that many constructs are expressions.
For example:
let result = if condition {
    10
} else {
    20
};
And:
let result = match value {
    1 => 100,
    _ => 0,
};
And even:
let result = loop {
    break 42;
};
This makes Rust code highly composable.
= Instead of ==Incorrect:
if age = 18 {
}
Correct:
if age == 18 {
}
Incorrect:
if number {
}
Correct:
if number > 0 {
}
This:
1..5
produces:
1
2
3
4
If you want 5 included:
1..=5
loopThis:
loop {
    println!("Hello");
}
never stops.
Usually you need:
break;
or another mechanism to terminate it.
ifThis doesn't work:
let result = if condition {
    10
} else {
    "Rust"
};
Both branches need compatible types.
Create a program that checks whether a number is even or odd.
Hint:
number % 2
Write a program that determines whether a number is:
Given marks from 0 to 100, calculate:
90–100 → A+
80–89  → A
70–79  → B
60–69  → C
50–59  → D
Below 50 → F
Ask yourself how you would generate the multiplication table of 7 using a for loop.
Calculate the sum of numbers from:
1 → 100
using a loop.
Given:
let numbers = [4, 8, 15, 16, 23, 42];
find whether 23 exists.
Stop searching once you find it.
Create a countdown from:
10
to:
1
and then print:
Blast off!
You now understand Rust's fundamental control-flow mechanisms:
ifelseelse if&&||!loopbreakcontinuewhileformatch_These concepts will appear throughout almost every Rust application you build.
Pixels to Perfection Design that Impresses